Tatyana Morozova
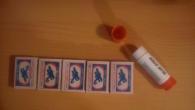
Universal dispenser cases.
These pencil cases we use very often both in the organization of GCD and in individual work and in didactic games. Filling pencil cases can be varied, in our case, these are geometric shapes.
For making pencil cases you will need(per child):
5 empty boxes of matches;
Glue stick;
Color self-adhesive film;
Scissors, colored cardboard (for geometric shapes);
Ruler.
1. Prepare empty matchboxes.
2. Using a glue stick, glue them together on the sides.

3. Measure the required amount of color film and cover the boxes with it.

4. On top of each part, stick an icon indicating the object that will be located in this particular "box"- in our case, a geometric figure (circle, square, triangle, rectangle, oval).

5. Fill in each cell with geometric shapes in accordance with the designation above (for example: 10 pieces each). The figures must be made in a different color on each side. Universal pencil case is ready.

Usage pencil case.
Didactic games for the formation of children's ability to navigate on a plane ("Decorate the carpet", "Treasure hunters", etc.)

Exercise in counting, composition of numbers from units, from two smaller numbers; in comparing sets.

It has already become an established tradition to purchase school supplies in stationery stores. But it is quite possible to make the most necessary attributes of a student - for example, a simple pencil case for pens and pencils - with your own hands. Such a product will compare favorably with the accessories of other children. And every time the child takes it in his hands, he will be able to feel the warmth of the care of mother's, grandmother's or sister's hands. There are different ways to make canisters from different types of material.
Let's get started!
Pencil case from the box
The simplest but most interesting do-it-yourself school pencil case can be made from an ordinary box. It is enough to put a velvet or leather lining on its bottom, and paste over the walls with beautiful paper. A box made of unpainted cardboard looks no less original and very stylish.

Pencil case made of cardboard cylinder and fabric
You can make a pencil case from a cardboard cylinder and fabric. For this you will need:
- one sufficiently wide and long cardboard cylinder or two shorter cylinders with the same diameter;
- piece of fabric;
- zipper;
- scissors;
- pencil;
- sewing thread and needle;
- stationery knife.

If we use one cylinder, then we cut it into two parts of unequal height - one should be shorter, the other longer.

If we use two cylinders, then we cut off half from one, which we use together with the second whole cylinder.
We circle the bottom of the cylinder in advance on thick cardboard and fabric. We make two cardboard and two fabric mugs.

We take a piece of fabric, the width of which should be enough to wrap the cylinder, leaving a little material on the edge. According to the height of the short part of the cylinder, we outline the distance from the edge of the prepared piece of fabric, make a cut. We sew a zipper between the resulting narrow and wide pieces of material.

We fold the resulting piece of fabric along the front side inward, sew along the edge.

We insert long and short cardboard cylinders into the resulting case, matching them with a zipper. (The side seam of the cover remains outside).
Below and above we substitute pre-cut cardboard and fabric circles. Along the edge, we sew a fabric circle to the cover put on the cylinder.

You can put a cotton pad between the cardboard and the fabric - for volume and softness.

After sewing, remove the cover and turn it on the front side. We put on the cylinders again. We glue.

Do-it-yourself cardboard pencil case
Watch the video on how to make a simple cardboard pencil case:
DIY leather pencil case
An easier option on how to make a pencil case for a school with your own hands is to use a rectangular patch of bright leather to create it. With the help of a clerical knife, along the ruler, in a checkerboard pattern, we make parallel cuts on it.

In each of these cuts, like rods in a basket, pencils or pens will be inserted.

Having rolled up the pencil case with a tube, we intercept it with a beautiful ribbon, the edges of which can be sewn to a leather flap.

Felt pencil case
A charming, soft pencil case for markers or felt-tip pens can be made from felt.

To make such a pencil case, we need:
- Braid
- glue gun

Cut out a rectangular piece. We can estimate the size by laying out markers on it. Apply glue between the markers, as shown in the photo. The gap between the markers will be 2.5 - 3 cm.

We bend the lower part of the fabric, gluing it between the markers.

We get markers. We apply strips of glue for ribbons.

We glue the ribbons. Cut off the excess.

We turn the pencil case over and apply glue for the ribbon with which we will wrap the pencil case. A strip of glue should not be more than 5-6 cm on the right or left side of the pencil case.

We glue the tape. Please note that the tape is not glued along the entire length.


We wrap it in a tube along with markers.


Watch the video on how to make a beautiful felt pencil case:
Watermelon pencil case for school (video)
Very gentle and very thoughtful pencil case for girls.
Felt pencil case for girls "Cat"
When I was looking for felt cases on the Internet, I really liked this gray cat. Let's try to make it. We cut out two parts of the craft from gray felt according to the model in the photo.

We cut one of the blanks into two parts. We sew a zipper into it.

On the front part we sew a mustache, nose and beady eyes.

We sew two blanks from the inside.

We turn out the craft. We sew the paws with a thick thread, making them look like cat claws. Pencil case-cat - ready!

How to sew a simple pencil case from fabric or oilcloth?
This simple version of the pencil case can be made from both ordinary dense fabric and fabric-based oilcloth. To make a pencil case, we need the material itself, a zipper, scissors and pins.

It will be most convenient to make a pencil case based on the size of the zipper. We cut out two identical rectangles from our material along a length equal to the size of the zipper.

We arrange the material in relation to the lightning as shown in the photo.

We sew the material to the zipper with threads. This is a temporary stitch. After we make a seam on a typewriter, we will remove the temporary seam.

We make a line on a sewing machine.

We sew with a temporary seam manually the second part of the material in a mirror.

We make a seam on a typewriter.
Many people think that a pen case and other stationery is an accessory for schoolchildren and students. In fact, it is needed in any apartment. It is convenient and practical to store pens and pencils in a place specially designated for them.
The stores offer a wide selection of accessories, but you can also sew the product yourself. Moreover, there are such models that do not require the use of a needle and thread in the manufacture.
Do-it-yourself pencil case
After about the first year, stationery and art supplies begin to appear in children: multi-colored pens, felt-tip pens and paint brushes. Moms have more housework, so it will be especially interesting for them to learn how to make a pencil case with their own hands.
 Parents of toddlers will need a pencil case. Firstly, the child will like to put products in bright containers. Secondly, this is a great chance for mommy to practice and improve her creative abilities.
No need to start with complex models. It will be enough to sew a regular bag-case with a drawstring. The work will take some of your time. A fabric bag can be decorated with braid, buttons, rhinestones or beads. Such pencil cases for children will be a real find, because they can be bright and interesting.
Before proceeding to the creation, it is worth considering the model of your pencil case, calculate its size, capacity and stability. All these points must be considered before you start sewing the product, because it will be sad if the supplies for work or painting are not included in the bag.
One of the lightweight models is a one-section cover with a zipper. With proper operation, such a handbag is modified. Then the internal space will be divided into two or three auxiliary departments, each of which can be closed with a zipper.
Bags vary in shape and size. They can be in the form of a cylinder, a parallelepiped, an animal, such as a cat. Experienced needlewomen can knit a fantasy pencil case with knitting needles, but for beginners it is better to choose simple models and the following fabrics:
- Synthetic
- Dense and non-slip, for example, a piece of unnecessary jeans or colorful cotton fabric (chintz, calico, satin).
- Jacket, raincoat, upholstery.
We sew a shark bag
The original handbag in the form of a shark will create a good mood for you and your child. For its manufacture it is necessary:

How to make a shark pencil case step by step


Felt cover
 Pencil cases made of felt are considered very original and easy to manufacture.
This material is malleable and requires processing, because its sections will not crumble, the inner and front seams only need to be overcast by hand, and to make the elements more beautiful, they are cut out with special scissors with serrated blades.
This method is also applicable to natural and artificial leather, suede.
Model without a pattern
All you need for such a pencil case is a rectangular piece of material, a ruler, a pencil or chalk and sharp scissors.
In the fabric piece, you need to create small notches that will serve as loops for brushes, pencils and pens. The holders are made along almost the entire length of the workpiece, with the exception of the front side, into which the color roll will be wrapped. In order for the bag not to open, from the side where there are no cuts, it is necessary to attach a braid or ribbon of sufficient length. Wrapped around the product, it will perfectly fix everything that is laid out inside and decorate the thing.
Attention, only TODAY!
Children often, unfortunately, are not particularly attentive, because they lose, or even completely forget, pencil cases with pens and pencils. Also, office supplies quickly stain pencil cases, making them unusable. If you do not use them, then backpacks and bags will already get dirty. In view of all this, it makes sense to implement one wonderful idea. It's about creating a pencil case out of paper with your own hands. Moreover, it will not just be some kind of useful craft. The fact is that such a pencil case can also be used as a bookmark. It turns out that such a little thing is 2 in 1. The funny muzzles of animals or cartoon characters painted on it will give the craft a special brightness, as well as make its use more enjoyable.
What do you need to create a paper pencil case?
All you need is a square of paper, glue and felt-tip pens.

Advice
A small pencil case is quite suitable for a couple, that is, several pens or pencils, and even a first grade student can create it.

To create a pencil case with your own hands, you need to take a square sheet of paper. For example, with dimensions of 17x17 centimeters. The most important thing here is that the paper is as dense as possible. A pencil case made of too thin paper will not have time to wear out, but simply fall apart. A square sheet of paper should be folded in half, then unfolded and each side folded to the center where there is a fold. The corner of the paper on the right is folded to the first vertical fold, and the corner on the other side must be folded, respectively, to the 2nd vertical fold. Having rolled up the paper, you will see that it turned out to be a pencil case. Next, you need to glue the corner on the back side - this will help the pencil case not to open.

On the finished product, it would be nice to draw the face of some animal or color it in accordance with your taste. Now pens, pencils and even a ruler will not be lost, and will not stain a backpack or bag yet. In addition, such a pencil case can be easily used as a bookmark for a book!

Complex pencil case
To create a complex pencil case, you will need scissors, a clerical knife, a cardboard cylinder, fabric, a zipper, threads with a needle and a pencil. The steps for making a canister are extremely simple. The cylinder is cut into 2 parts. One will be longer and the other shorter. Next, the bottom of the cylinder is outlined on cardboard and fabric. From it you need to cut 2 circles. And 2 more mugs should be made of cardboard. Next, the cylinder is wrapped in fabric, but so that it remains a little on the edge. From the edges of the material, the distance along the height of the short part of the cylinder is marked, then a cut is made. Sew a zipper between the long and short pieces of fabric. Next, the resulting piece of material is folded along, leaving the front side from the inside, after which everything is sewn along the edge. The result is a cover. Short and long cylinders are inserted into it, matching them with the lock. And cardboard circles, as well as fabrics, are placed up and down. Between them you need to put a cotton pad, this will make the pencil case soft and voluminous. The fabric circle is sewn to the cover, then it is removed and turned inside out on the front side. After that, he puts on the cylinder again and everything is glued.

Pencil case from the disc box
Cut off the part of the case where the disc was. You need to cut out this circle with a clerical knife. Next, a rectangle is cut out of thick cardboard, it must be placed inside the case. Then the desired size of the fabric cut is taken, cardboard is wrapped around it and fixed with glue. You can also print some interesting, colored cover and stick it on the pencil case.

Conclusion:
A school pencil case is a useful and, alas, often failing accessory. It should be in the arsenal of every student. You can make it out of paper in many different ways. If you do not want to mess around for a long time, you can make it from a box for a disk.
We make a pencil case out of paper with our own hands
Paper pencil case
"School supplies" - parents know how relevant this topic is not only at the beginning of the school year, but throughout the year. This is especially true for younger students. Pens, notebooks, pencils, pencil cases - all this is often lost in children, breaks and becomes unusable. How to sew a pencil case with your own hands in such a way as to surprise and please your child - we know the answer to this question. We hope that you will choose from several product options - the most interesting and fashionable.
It is not difficult to sew a pencil case with your own hands, you can take any material - coarse calico, velveteen, satin, felt, felt, denim, and so on. Even bright socks will do - you can make a cool pencil case Cat out of them. Pencil cases must have a lining, and some have a synthetic winterizer or interlining.
The second option is a product with an Owl application. The third interesting stationery pencil case is. You will find the fourth pencil case Bunny at the end of this article.
The quickest and most budget-friendly option for a school pencil case is a cool pencil case made from brightly colored socks. The brighter you take the socks, the more interesting the pencil case will turn out. You can make such an interesting little thing with hot glue or a needle and thread. If you decide that you will sew the pencil case, and not glue it, this will certainly be a more reliable option than glue. The pencil case pattern here is very simple: from one sock we make the pencil case itself, and from the other - the Cat's head, paws, ears and tail.

For work you will need:
- Terry or fleece socks (it is better to take an adult size).
- Zipper 20 cm.
- A piece of fabric for lining - length - 21 cm, width - 20 cm.
- Glue gun or thread with a needle (optional).
- Ribbon for a bow.
- Ruler, scissors.
- Sintepon or cotton wool for stuffing small parts.

First of all, we make a stitched lining for the Cat. To do this, we bend a piece of fabric prepared for lining in half. Estimating the length: sets of pens and pencils should be shorter than the length of the lining.

Then glue with hot glue or sew the zipper to the lining. The zipper looks up.


We take the ends of the thread and tighten them harder into a knot. Unzip the zipper and set aside the lining. Let's do the cutting.

We begin to cut the pencil case. We take a ruler, apply it to the beginning of the sock, measure 20 cm and cut it off, as in the photo. The bottom of the sock will go to the pencil case itself, and the top to the paws.

Then we cut 18 cm without cutting to the end. Next, we will connect the lining with the main part of the pencil case for the school.

We lay out the finished lining inside the main part. Sew or glue, connecting the lining and the main part.

The cut edge must be collected by hand and tighten the thread, tying a knot. In this place will be the head of the Cat.

Next, we make patterns for the head, paws, ears and tail. To do this, you need to take a ruler, measure 9 cm from the second toe and cut it off. This will be the head. Next, we need to cut off 4 more 9/9 cm rectangles - these are the paws, 1 10/9 cm rectangle is the tail, and 4 triangles with a base of 5 cm are the ears of the Cat.

We stuff the Cat's head with padding polyester, cotton wool, or just finely chopped scraps of fabric. We sew 4 paws along, slightly rounding at the end, on the wrong side. We twist on the face. The raw edges are carefully pulled together and sewn together.
We also make out the head: we tighten, sew and make out the muzzle - we sew on buttons, beads or pieces of felt instead of eyes. We embroider mustaches with threads.

Then we glue or sew the front and hind legs to the main part. We sew the details of the ears, sew to the head.

Only after that we sew or glue the Cat's head to his body. That's all, the sewn pencil case is ready. It remains only to tie a ribbon around the cat's neck.

We sew a pencil case with one compartment and with appliqué. This master class is more serious and more difficult than the previous one. However, if desired, in one or two evenings it is quite possible to master this interesting work. Transfer the Owl pattern to paper, and then to the fabric. We will sew a pencil case according to a simple pattern, all the required sizes will be indicated. In this work, for the desired volume, it is desirable to use a synthetic winterizer.
If you don’t have a padding polyester, it’s okay, buy viscose napkins at the hardware store, they may well replace the padding polyester.

For work you will need:
- Main fabric - 2 pieces of blue color - 26/8 cm, 1 piece of blue color - 26/10 cm.
- Sintepon or napkin - 27/27 cm.
- Lining - 27/27 cm.
- For finishing strips from the main fabric: 2 pcs. - 13/3 cm., 2 pcs. - 6/10 cm.
- Patches for application.
- Scissors, needle, thread.
- Sewing machine (optional).
- 2 buttons for the eyes.
- Ruler, pencil.
- Lightning - not less than 28 cm (iron slider is desirable)

Let's start with patterns: cut the fabric according to the indicated dimensions. We got 3 strips: 26/8 cm, 26/10 cm, 26/8 cm. We must sew them, folding them with the right sides inward.
After that, take a ruler and a pencil and draw the same squares on the fabric. Next, we cut out the parts of the application, according to the pattern.

It is better to take a brighter material for Owl applique: this way the owl will not merge with the main fabric.

We apply the synthetic winterizer to the main part and quilt the main part of the product by machine or manually.

From above we adjust the application, sew on the buttons-eyes.

After we quilted the main fabric and synthetic winterizer, we got this blank. Next, we apply the zipper to the edge of the long side, we cut it off with pins, we put the lining on top, we cut it off.

And we grind this “pie”, stepping back from the edge by 0.8 mm-1 cm.

This is how we begin to connect all 3 fabrics and the zipper.

We turn the blank on the front and sew the finishing line 0.3 mm. from the seam.

Then we take our blank and fold it in half so that one half of the lightning meets the other half. We put a lining on top, we chop off with pins.

And sew, stepping back from the edge of 1 cm.

We cut out 2 "tongues" 6/10 cm for decoration. We grind them along the length, turn them out and insert them into the middle from one side and the other. The “tail” should stick out by 1 cm. We chip with pins.

To decorate the seams, we take 4 facings 13/3 cm cut out by us. We put it on the side and sew it on 1 cm.

Turn over to the other side, bend the free edge of the facing and sew a seam into a seam. They took a ruler and a pencil, marked from the corners 2 and 2 cm, drew a square. We draw a square on all 4 corners of the pencil case. We must connect these corners, giving the product volume.

Sew all 4 corners of the product, cut off excess material, decorate with the remaining two facings. Turn out on the face. Here is such a case in the form of a pencil case should turn out in the end.

On the video: how to sew a pencil case. You can look in more detail if something is not clear in the master class.